The
Japanese MR2 Turbo FAQ:
Part Three
Part One : An A-Z guide to the Japanese MR2 Turbo
Part Two: A UK Buyers guide to buying the perfect MR2 Turbo
Part Three : Common reported problems, and cures
|
The
Japanese MR2 Turbo FAQ: Part One : An A-Z guide to the Japanese MR2 Turbo Part Two: A UK Buyers guide to buying the perfect MR2 Turbo Part Three : Common reported problems, and cures
This FAQ has been compiled by Ben Formesyn,
based on information provided
|
[ Previous part of FAQ :: First Part of FAQ ]
Common problems and Cures.
Although the MR2 Turbo is in general a reliable car, there are a few commonly recurring questions on the various MR2 Mailing lists. Below is a collection of these questions and answers which I've personally found useful. If you find and solve a problem with your MR2 Turbo that isn't on this list, please let me know and I'll add it for the benefit of other UK owners.
You may also like to search the international MR2 mailing list to find posts on your problem - I've found it very useful in the past.
Also check the various information articles on mr2.com - there is an lot of exellent advice there.
Normally, the boost gauge should reach up to the + mark on the dashboard gauge - typically, flooring the accelerator in 3rd and 4th at low revs (3k rpm) will cause this.
If this isn't happening, things to check include:
All the air hoses for splits, tears and loose fitting (leaking) connections.
Check the tiny in line air filter next to the turbo pressure sensor is not clogged with dirt.
Engine ECU codes - the engine may be limiting boost to safe levels due to a sensor malfunction - check the ECU for any stored codes, to give a guideline as to what to check.
Blow off Valves - a few owners have reported that Blitz performance models can leak pressure back to the intake, limiting the boost pressure that the turbo can achieve. This is difficult to diagnose, without a rolling road to test the car on, or without blanking off the blow off valve and running the car without the valve - which is not good for the compressor turbine when you suddenly lift off the accelerator under boost.
Fuel choice: Some owners have found that their cars run full boost more reliably when using 98 Octane super unleaded - this is because when normal UK 'Unleaded' (95 Octane) is used the engine knocks under boost, and the ECU detecting this limits boost to 7psi.
Due to the complexity of the turbocharging system, if none of the above reveal the source of the problem, it is best left to Toyota or a performance tuning garage with experience of Turbo systems to complete the diagnosis.
Note however, that the car will not make full boost anyway under certain conditions:
When the engine is not fully warm (temp gauge less than 1/4 up) - basically to protect the engine mechanicals from excessive wear.
When the external air temperature is less than 5C/ 40F - as the air is denser when cold Toyota reason less boost is needed for the same power.
If the car very abruptly looses and gains power, and if this occurs under boost, then it is most likely to be related to the HT electricals of the Turbo. The HT Electrical system is a very common source of problems, and is often overlooked. A good first move is to immediately replace the cap and rotor arm if your car is running unevenly - this will cost you less than the diagnosis fee some Toyota Garages charge!
Check :
The distributor rotor cap and arms for corrosion and white deposits from
arcing - the Turbo seems to 'eat' rotor caps and arms in as little as 20,000 miles,
causing energy to be wasted in causing a spark to jump the gap between rotor and
distributor rather than at the plug. A replacement allows smoother running at higher RPMs.
A replacement cap can be sourced from Toyota UK, the USA or it is reported that a Lucas distributor
cap DDJ304 will fit the turbo (* See note). For some reason Lucas
don't make a rotor arm to go with this cap but the rotor arm is available from Blue Print
parts, part no ADT314314 (129812). They have a technical helpline no. Tel. 01622 833004.
* Note: Two different designs of rotor cap were used on the turbo:
A pre- 92 and post 92. It is not known which cars the above cap fits ! (although I'd
suspect the 90-92 cars)
Also check the leads - they seem to last around 5 years before they need changing. A simple check is to start the engine somewhere in the dark, and look around where the leads are and see if you can spot any blue arcing where HT is leaking away. If you see any, you'll need to invest in a new plug lead set, at around £80 from Toyota UK, or alternatively you could buy them from the US.
The symptoms are that when running UK 95 Octane unleaded petrol, when accelerating the engine knocks (/pinks) and this is being detected by the engine knock sensor. In order to protect the engine the ECU retards the timing until no more knocking is detected. If the ECU is still detecting knocking at this point, it may go one step further and close the turbo VSV, to limit the boost to a lower, safer, value.
This often happens at around 5k rpm, and if accelerating hard with full boost there is a quite noticeable drop in power as the ECU closes the VSV and the boost level drops. This is probably caused as in Japan Unleaded fuel is either 98 or 100 octane.
The only cure is to retard the spark timing at the distributor: In my case, it had to be moved to 5 degrees BTDC, and the car will run 95 Octane unleaded, at the expense of a little top end power and affect cold engine performance.
Although there could be many possible causes, a common one seems to be the Engine Coolant Sensor not telling the ECU the engine is cold before the Oxygen sensor starts to work. The net result of this is that the car runs very lean, and only picks up power when lots of throttle is used.
The sensor appears to change its resistance with age, and although remaining within the Toyota specification, a new one seems to help the cold power issue I had. Note that retarding the timing to run 95 Octane Unleaded will also make this worse.
This is a common problem with all cars with T-Bars - the cure is quite a simple one :
Eccentric T-Top lug guides are also available at the cost of around £10 per side -
they force the T-Tops down harder to give a better quality seal - details of this and
other fixes are on MR2.com. A
write up of the installation of these eccentric guides is available on Jon
Sturgeon's page.
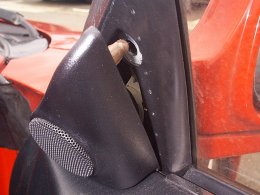
Q: I'm getting wind noise from the door seal/ mirror area
This seems to be a common problem for MR2's - most people seem to just turn the stereo up and ignore it though !
To verify the problem, whilst driving along with the noise coming from the speaker, put your hand over the small tweeter cover behind the wing mirror - if you can feel air flowing past your hand you've got a small air leak.
| Pry off the speaker cover, and then remove the three screws which hold the mirror and tweeter assembly |
|
| - this may not be easy as the bolts have been held in place using thread locking glue which only releases its grip when heated above 75oC. Therefore use a hairdryer or similar (whilst protecting the other plastic trim) to head the head of the screw to above 75oC to remove them. |
|
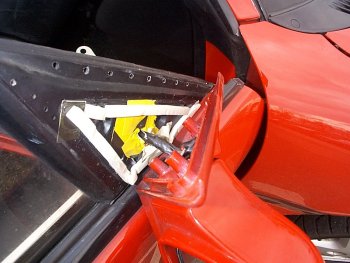
Once this is done, you'll see one large remaining bolt in the middle of the mirror, which looks part way out - remove this, and the mirror will come off. Looking at what this has revealed you'll find a number of large holes were cut through the door for the mirror's wiring loom.
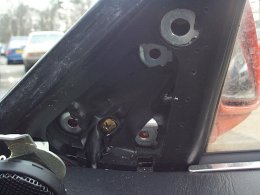 |
To stop the air flowing though these, seal them up as much as possible using a few layers of 'gaffer' tape (or any other thick PVC tape), remembering to keep the appropriate holes clear to mount the mirror back on. |
| Then clean both the door rubber seal and the mounting plate, and apply some Silicone lubricant to the rubber seal to make it really water and air tight. You could also put a lining of foam draft excluder around to really finish off the job well. |
|
|
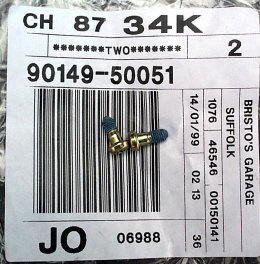
Next, using new screws, reassemble everything and put the mirror back on
the car.
Enjoy silent motoring !
|
If you have an error code stored in the ECU, the yellow engine symbol in the bottom left of the dashboard will light up.
To extract the code, with the engine off and the ignition key in the on position (the position the key is normally in with the engine running) link the E1 and TE1 connectors on the grey diagnostics connector, in the offside rear part of the engine bay.
See Part One of the FAQ on Engine Management Codes, and also Dennis's Celica Celica GT4 turbo technical information page for further help on extracting and interpreting codes - the GT4 uses the same engine as the MR2 Turbo, and the codes appear to be the same.
 First off, thanks to Olli
for the scans that went to make the MR2 Turbo Stereo
wiring diagram, - Note this is 380kb in size!
First off, thanks to Olli
for the scans that went to make the MR2 Turbo Stereo
wiring diagram, - Note this is 380kb in size!
All Japanese MR2 factory fitted stereos have a non standard 'Toyota' line level output signal which is fed to a separate amplifier (behind the passenger, next to the safety belt reel behind the panel), and the outputs from this are distributed to each speakers.
Basically, the long and the short of this is that you can't always just plug in a new head and use a wiring adapter and expect everything to work.
So, what I've done is to basically bypass all the existing wiring and put in my own between the new head until and each of the speakers. This does mean you can use better quality cable, and replace the speakers in the doors etc so the sound quality will be much better.
However, you do need to be handy with a soldering iron to do the job, and it will take most of a Saturday to do. See the MR2.com website for information on removing interior body panels, but most are just held in place by snap on connectors which pop out with some persuasion, once the obvious screws are removed.
I also tapped directly into the fusebox at the drivers feet to get a good +12v supply for the stereo - using the supply from the one on the existing wiring loom was causing the display on my Stereo to fade in time with the baseline.
However, if this is beyond what you're happy to do most Stereo places will install it for you, especially if you're spending the money on an expensive new head unit. Some will do it for free, others may charge around 50 quid as its such a tricky job to do on an MR2.
The Following guide came from John Helps - I've since installed the gauge myself into my car.
Great gauge, very fast reading and well made, tricky installation but possible.
The gauge is a 46mm HKS Boost with lettering and background to match the original.
Once the entire gauge pinnacle has been removed separate the layers ie. back plate with gauges, front plate surround and plastic "glass", they're just clipped together. Remove the existing boost gauge and the
speedo and rev counter (just unscrew from the rear). This should give enough room to work on the aperture left by the original boost gauge. The HKS bg will not fit at first, so cut away the plastic on the white
backing plate where it is squared off, I used a Stanley, then remove the remaining obstructions, some small mouldings, (I used a soldering iron and melted them away). You will need to drill out the two mounting holes for the old boost gauge and make them wider so that the new gauge will rotate to the upright position with the vacuum tubing and electrical connections passing through the holes. I then soldered the wires for the backlight on to the printed circuit film at the points where the existing pod lighting mountings where.
Finally and most importantly you need to cut away the original black back plate to allow the gauge to fit snugly. Mark out the circle of 46 mm on the rear of the plate and cut away the plate with some sharp
cutters bur not too close to your marking. Then I used a half round file to ease out the opening to accept the body of the gauge. It fits with the bezel and glass on the front, the body of the gauge sitting in the
area you have cleared in the white plastic with the original mounting screws still attached and the vacuum pipe and electrical connections passing thro the two holes. Put it all together run the vacuum pipe thro the dash area and then down and along the centre tunnel and thro a small hole (I drilled) in the gear cable grommet and into the engine bay. NB. the tubing supplied is not long enough so I joined it with a
tiny union to another length of tubing, this join is inside the cabin on the tunnel just before it passes thro the firewall. You will need to buy about 3 meters of extra tubing or you may wish to purchase 6 meters
and have no join. I then slid a length of 9.5mm EFI hose (from Halfords) over the vacuum pipe to protect it from the heat around the exhaust and brought it up and over the silver protection plate on the fire wall. I tied it up around the drivers side of the engine bay, under the removabal side plate and then joined it to the inlet manifold vacuum tube with the hardware provided in the gauge kit. Be sure to put the tiny restrictor in the T piece, this is shown pictorially in the Japanese literature supplied with the gauge kit.
Job done.
John 94T
For the 92-on cars, Bilstein Shock absorbers were fitted by Toyota.
I was looking to replace mine to fix them rattling first thing in the morning, and to improve the ride quality. I decided against lowered springs and shocks as the ride on the Turbo is firm enough as it is.
Toyota GB unfortunately wanted well over the odds for replacement parts (£110 - £130 for the fronts, £150ea for the rears) as well as 2.15 hours fitting at £50 an hour, making the total job around £920 (!!)
However, I decided to shop around and see if I could get the same parts direct from Bilstein : After phoning around the US and Europe I found Bilstein UK (0208 956 5049 - Trade sales only) and got their their part numbers for the 92-on Turbo:
Left Front : V36-4017
Right Front : V36-4018
Left rear : V36-4019
Right Rear : V36-4020
Demon Tweaks will do these for £132.38 (112.66+VAT) each, but I bought mine from Elite who did them for £101 each, plus £125 fitting, bringing the total bill to £620, of course including a four wheel alignment afterwards!