Last updated 21/9/99 |
Coxing Amp Design Copyright © Ben Formesyn '96-99.
|

[ DIY Circuit Diagram | The Spec & costs | Preamp
| Power Amp | Charger ]
[ See photo's of the finished Cox Amp | Testing and Fault Finding ]
I've been building my own coxboxes for around 15 years now, and my design for a coxbox has evolved to the one that is here on this page, as the most rugged and reliable for use in a typical Club.
I wrote this page as a result of posting a message to the newsgroup rec.sport.rowing saying that it was possible to build your own coxboxes for much less than many of the commercial alternatives. Much to my surprise, I received many e-mails asking for the design, which led to me writing this page as the simplest way of distributing the information to all rowers with access to the Internet.
The coxamp is designed to give a whole weekend regatta's worth of use (around 10 hours) from one charge, weigh less than 400g and to be powerful enough to drive four speakers in an eight.
To give you an idea of the cost of building this design, I've included some outline pricing for the different parts of the design, assuming you can get most of the parts mail order :
| Costing is roughly : | (in GBP) |
| 6 x 650mAh AA 1.2v Ni-Cd rechargeable batteries (giving 7.2 V) | 8 |
| LM383 based power Amplifier circuit | 9 |
| Microphone pre-amp circuit | 6 |
| NiCd Charger circuit, Power supply & components | 13 |
| Microphone, headband, boom for microphone | 5 |
| Speaker Cabling for boat/ Microphone cable | 6 |
| Waterproof box, speaker and coxamp Connectors | 8 |
| Grand Total: | 55 Pounds |
If you are kitting a boat out from scratch, you'll need to add the costs of waterproof horn speakers at around 8-10 GBP each direct from suppliers. At Sudbury, we usually find three speakers in an eight is enough : I'd put them at the feet of six, four and two.
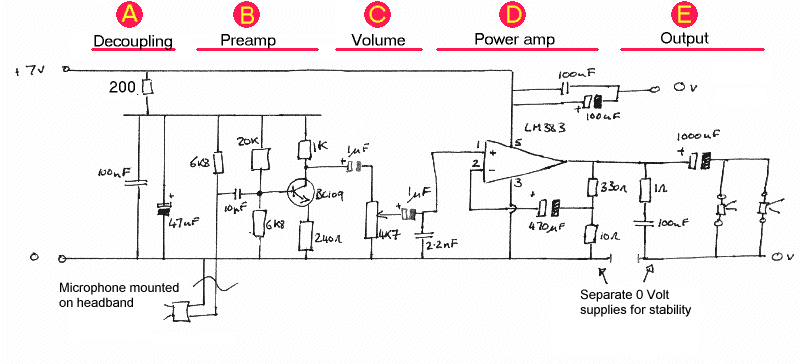
This is the heart of the coxbox - the design can be read left to right, with each part of the overall design labelled A to E. Each each area is 'Clickable' taking you to an explanation of what that part of the circuit is and a short technical explanation of how its works.
Unfortunately the circuit diagram graphic is quite large (so to be legible) and you may need to scroll the page sideways to see it all.
Note that diagram below does not give the design for the battery charger - it is given separately at the bottom of this page.
If you intend to actually build this, looking at photos of one I've built may give you some useful clues as how you can put it all together in a small box, as well as a suggested Veroboard layout.
 |
This simple part of the circuit decouples the sensitive preamplifier from
the possibly noisy +ve supply. The 200 ohm resistor and two capacitors below it form a crude but effective low pass filter to give a quiet supply to the preamplifier and microphone stages. They also form a filter to stop high frequency feedback which can occur though the +ve supply. The power amplifier can cause the +ve supply rail to vary in voltage (depending on the level of the output signal) and if this variation finds its way back into the signal input of the amplifier, it completes the loop causing more variations - this is 'feedback'. This type is electrical feedback - audio feedback is similar, and is what you get if you put a microphone close to a loudspeaker, typically causing whistling and squeals. Note: In this design, 0 Volts is taken to be the -ve power supply of the battery. . |
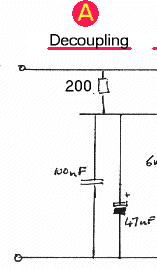
This part of the circuit has two jobs : Firstly to provide a small amount
of power to the active microphone, and secondly to slightly amplify the high impedance,
low level signal enough for the power amplifier to work. The filtered +ve supply from
above is used to power this sensitive preamplifier. Technical detailsThe condensing microphone (not shown on the circuit left) is an 'active' type, requiring a power supply to work. This is provided via the 6.8k ohm resistor, from the decoupled (now quiet) +ve supply rail. This would then connect to the microphone via wiring and plugs, as discussed below. The low noise NPN BC109C transistor and surrounding components act as a low amplification (gain) common emitter amplifier. The gain is determined by the ratio of the resistors above and below the BC109C transistor. In the diagram it is set to x4 by 1k/240 ohms, and can be increased or decreased by changing the 1k resistor for other values. Testing : Not much really - build it up, check the circuit doesn't draw more than 5mA. Fault Finding : If you have access to an oscilloscope, you should find that the input from the microphone will be a high impedance signal with an amplitude of around 0.25v peak - peak, superimposed on a DC level. The output from the circuit will be a low impedance signal of around 1volt peak-peak, suitable for driving the volume control. |
 |
 |
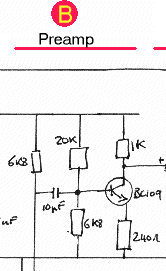
The function of this part of the circuit is to allow you to adjust the
level of the signal passed to the amplifier, varying it between no reduction from the
output from the preamplifier (i.e. all the signal is amplified) progressively to a smaller
and smaller signal to the point where the input to the power amplifier is to connected to
-ve, so giving a silent output as there is nothing to amplify. Technical descriptionAll volume controls are fundamentally 'potential dividers' which attenuate the input signal to a lower and lower level depending on the position of the wiper on the potentiometer. The two 1uF capacitors are needed to block the DC components of the audio signal whilst passing the AC audio signal. The 2.2nF capacitor on the right should be placed as close as possible to the amplifier input pins, and ideally a high quality polystyrene capacitor - it is needed by the LM383 for stability to stop very high frequency (inaudible) oscillations or ringing. |
Note: This Amplifier Chip went out of production in October '98 See the new design using the TDA 1020 amplifierThe power amplifier section is based around the LM383 amplifier, produced by National Semiconductor. I have found that it is one of the very few amplifiers that will operate well from a low voltage battery source, and provide a decent power output. In the configuration given on the right, it operates as a non inverting amplifier, with the gain set by the formula 1+(330/10) giving 34 in this design. You should find this more than enough, but it can be increased by making the 330 ohm resistor larger. Note that as you increase the gain, you increase the probability that the circuit will become unstable and cause unwanted oscillations at some point. Importantly, the two +ve supply decoupling capacitors at the top of the picture should be placed as close as possible to the amplifier, to supply short peaks of instantaneous current to the amplifier, so making it more stable when the batteries are running down and are nearly flat. |
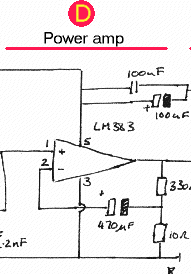 |
Maplin Electronics sell a LM383 kit (As the 8
Watt amplifier kit) for around £10, using the circuit diagram below, which is remarkably
similar to the one National Semiconductor give on their datasheets for the
amplifier...(odd that !) 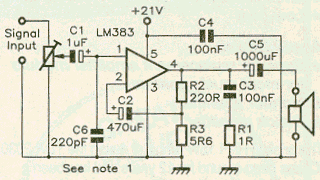
The LM383 will work happily with supply voltages between 5 and the 21 volts shown on the diagram. The 100k variable resistor shown on this diagram performs a volume control function on the input is just another volume control - you need to adjust it as required - see wiring later.
If you use the Maplin kit, one design flaw in its circuit board is that the amp -ve signal input is in fact the -ve signal input to the whole amplifier, and will have to carry a lot of current back to the battery. If you use this kit, you - make this a nice chunky wire capable of carrying 500mA to avoid grounding problems later.
Using the design as is, with a 7.2 volt supply and a 2 ohm load (4x 8 ohm speakers wired in parallel, as you may find in an eight) I measured an output power of over 10 watts which should be more than enough for most boats (but never is enough for bow!)
Tweaks for a louder output: (if you must)
Testing : Check before first power up that the resistance between -ve and +ve is high, and that there are no blobs of solder crossing tracks on the circuit board. When turned on, the normal power consumption of the LM383 is around 50mA +/- 10mA, regardless of supply voltage. If the amplifier starts to oscillate, you'll find that the current drawn will rise well above this to 500mA or more, and the chip will get very hot very quickly. If this is the case, turn off the power and check the decoupling of the power rails, input and output, and the decoupling capacitors
Fault Finding: If you end up with feedback in your circuit, check the +ve and -ve supplies for any AC noise using an oscilloscope. If you find any, your decoupling isn't working.
A critical part of the amplifier design is to ensure the 100nF / 1ohm combination is as close as possible to the output of the amplifier. These two components effectively surpress any ambitions the LM383 has of becoming a high frequency oscillator - which this amplifier chip has a nasty tendency of doing. If it does oscillate, you will find that the amplifier will start sucking 500mA from the batteries, and the heatsink tab will get hot very quickly - confusingly, it may also be working well as an audio amplifier, so making troubleshooting difficult. If you have problems with this, try increasing the value of the decoupling capacitors on the +ve supply to the amplifier, and make the 100nF capacitor bigger on the output - ensure you use a low inductance capacitor for this, such as a Polystyrene one.
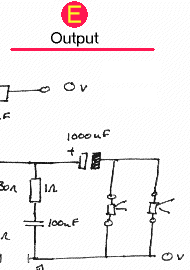 |
This stage decouples the amplifier output to the speakers in the boat. The speakers shown in the diagram will be in the boat, connected to the coxbox using a suitable suitable connector. I would suggest wiring the speakers in parallel, rather than series - this reduces the failure points of the wiring, and speakers when they die (and they do!) they usually fail open circuit - and so wiring them this way doesn't stop the others working. Obviously you need to connect the coxbox to speakers in the boat - I have found that this often is the most critical part of the design, and most problem prone. My favored connectors are the type used on remote control model battery power packs - rugged, waterproof and locking (see the scanned photos). A little extra heat shrinkable sleeving on them makes them even more sturdy. Note : As explained above, the 1 Ohm resistor and 100nF capacitor are essential to ensure that the amplifier works correctly. Without them you'll end up with ultrasonic whistling (feedback, or ringing) and poor battery life. If you don't include them, you may find dogs running along the bank barking at you as you're making the boat an enormous silent (ultrasonic) dog whistle. |
Having built the coxbox, you will need to also charge it up - taking the box to bits every time to do this is obviously a not a good idea. The circuit shown below is a simple constant current design, as required by the NiCd batteries which are used to power the system. It will charge the batteries at a constant 50mA, so recharging standard 500mAh AA size batteries in around 12-14 hours. At this slow rate of recharging, it is safe to leave the batteries charging indefinitely.
One of the parts to the circuit which I like is that when successfully charging, the LED will light up, giving a good confidence that all is well.
In order for this circuit to work, the input voltage to the circuit needs to be at least 5v higher than the battery being charged, so for a 7.2 volt battery pack in the coxamp, use a cheap unregulated 12v supply, or even a transformer output. Make sure the supply used can supply enough current for the design.
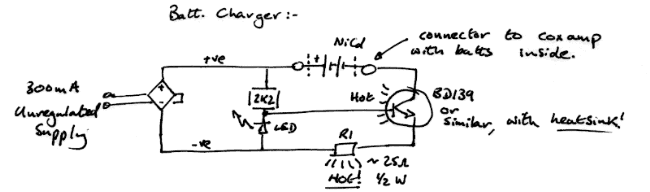
The input to the circuit goes though a bridge rectifier to allow use of an AC source, or a DC source of unknown polarity ( most cheap unregulated 300mA PSU's allow you to change their output polarity - and someone always will accidentally, so the use of a bridge stops them damaging the circuit)
This circuit relies on the constant forward voltage drop of the LED being 2.1 volts. As 0.7 volts is dropped between the base and emitter of the BD139 transistor (or any other power NPN transistor), 1.4volts will always be dropped across R1. Therefore adjusting the value of R gives you a current level which you can set ( using the formula I=V/R ). For a 50mA charging rate, R1 is 25 Ohms, which can be achieved cheaply by putting two 0.25W 51Ohm resistors in parallel.
Teaks : Changing R1 to a smaller value will increase the charging current, a realistic maximum being around 500mA for strictly one hour to 80% charge AA rechargeables. If you do this, ensure that the transistor and resistors are attached to heatsinks so they can dissipate the extra heat they will generate with higher currents. You could also charge the coxbox from a car, using the 12v supply from the battery.
Testing: Connect a Multimeter switched to its current range into the circuit where the NiCd batteries would normally be and measure the current - with the components shown, it should be around 50mA, and the red LED will come on.
OK, hopefully you've built the amplifier onto a single piece of Veroboad, which will fit into your selected waterproof box with the batteries and connectors you are using. I'd really suggest looking at the photos of one I built recently for ideas on how this all can be crammed into a small space, using a single small piece of veroboard.
The final checklist of things to do before you switch it on should be :-
Hopefully, the results of your hard work will be perfect, and work first time !
However, if you don't get anything from the amplifier, then a few other things to check are check :-
If all is well, congratulations ! Go ahead and box it up. Some quick tips for waterproofing: Always use silicone based sealant to seal the edges of the box, but not bathroom tile type silicone sealant - as it cures it releases acid which eats away at metals like your circuit board and components! I'd suggest using a waterproof box to start off with and avoiding this whole problem.
Use locking connectors for the wiring in the boat, and for wires to the coxamp to prevent things becoming unplugged whilst rowing. I use a single waterproof 5 way connector onto the coxing amplifier, as shown in the photos.
If you do get stuck, try e-mailing me with as much detail as possible, and I'll try to help as best I can.
You are visitor to take a look at this design since the site moved in August '97.
The 'Coxbox' name is a trademark owned by NK
Coxboxes
Since writing these pages I've also found out that the word 'Coxamp' is a trademark owned
by CPA. Full contact details for these and other UK and US companies are here.
![]() Back to Ben's home page, or
Back to Ben's home page, or ![]() Back to the Sudbury RC
site
Back to the Sudbury RC
site